Learning how to embed Power BI reports and dashboards into various applications has become popular with 3Cloud clients as it allows for faster insights into data and reports. In this example, we will review a quick and relatively easy way to embed reports within a demo environment.

When working with clients, I begin by using OAuth 2.0, which is an industry standard when it comes to authorization. Additionally, the example application is set up with Azure Active Directory. To register your application with Azure Active Directory, check out Power BI’s developer applications here. Once there, enter the information for your application and desired permission settings. Then, select the “Register App” button at the end and be sure to save the Client ID and Client Secret it generates. You will need them later and there is no way to retrieve the Client Secret after leaving this page.
Within Azure Active Directory, you will need to use a bit of code to initiate the exchange sequence described below. The example ASP.NET Core code snippet (shown below) handles security communication between your application and Power BI, ensuring that only authorized users can view embedded reports. This code snippet is for a controller in an MVC app called “Report”.
public class ReportController : Controller
{
// Fill in the Client ID, Client Secret, and application port number in the fields below
private string ClientID = “{Client ID goes here}”;
private string ClientSecret = “{Client Secret goes here}”;
private string RedirectURL = “http://localhost:{port}/Report”;
public async Task Index()
{
if (Request.Cookies.ContainsKey(“token”))
{
// If we have a token go ahead and use it
ViewData[“token”] = Request.Cookies[“token”];
}
else if (Request.Query.ContainsKey(“code”))
{
// If we have a code, we need to exchange that for a token
string strToken = await GetAccessToken(Request.Query[“code”], ClientID, ClientSecret, RedirectURL);
Response.Cookies.Append(“token”, strToken);
Response.Redirect(“/Report”);
}
else
{
// No token or code so have the user login and get a code
GetAuthorizationCode();
}
return View();
}
public void GetAuthorizationCode()
{
Dictionary<string, string> paramList = new Dictionary<string, string>();
paramList.Add(“response_type”, “code”);
paramList.Add(“client_id”, ClientID);
paramList.Add(“resource”, “https://analysis.windows.net/powerbi/api”);
paramList.Add(“redirect_uri”, RedirectURL);
string strUrl = QueryHelpers.AddQueryString(“https://login.windows.net/common/oauth2/authorize”, paramList);
Response.Redirect(strUrl);
}
public async Task GetAccessToken(string authorizationCode, string clientID, string clientSecret, string redirectUri)
{
TokenCache TC = new TokenCache();
string authority = “https://login.windows.net/common/oauth2/authorize”;
AuthenticationContext AC = new AuthenticationContext(authority, TC);
ClientCredential cc = new ClientCredential(clientID, clientSecret);
AuthenticationResult result = await AC.AcquireTokenByAuthorizationCodeAsync(authorizationCode, new Uri(redirectUri), cc);
return result.AccessToken;
}
}
You might notice in the code snippet above that we use security tokens. An easy way to understand security tokens is to liken them to personnel badges used to secure buildings. The first time that you visit the building, you might have to present your driver’s license or some other form of identification (similar to OAuth2). After proving who you are, you receive a security badge for the building. Now, the next time you visit, you will only need to show your security badge and won’t have to dig out your driver’s license each time.
In short, the security token is used every time a user visits the page. An important thing to note about the above code snippet is that a security token will expire after a 1-hour period and then a new one is needed. You will want to keep this in mind when preparing your application.
In addition to the code snippet, you will also need to add in code for the front-end embedding process. For this, you will need to get the Report ID you wish to embed. You find this by browsing to your Power BI application and running the desired report. The URL will look something like the following:
https://app.powerbi.com/groups/me/reports/{report guid}/ReportSection
You will need to use the report GUID as the report ID in the code snippet for the front-end embedding. An example of the code is shown below:
By using the Active Directory Authentication Library (ADAL) provided by Microsoft, you can save yourself a lot of heavy lifting and let the library handle most of the work. I recommend this tactic because not only will you eliminate the time spent decoding, but if, in the future, Microsoft were to update or change any of the authentication codes, it would be fixed automatically. This will prevent you from needing to rewrite your code and fix errors.
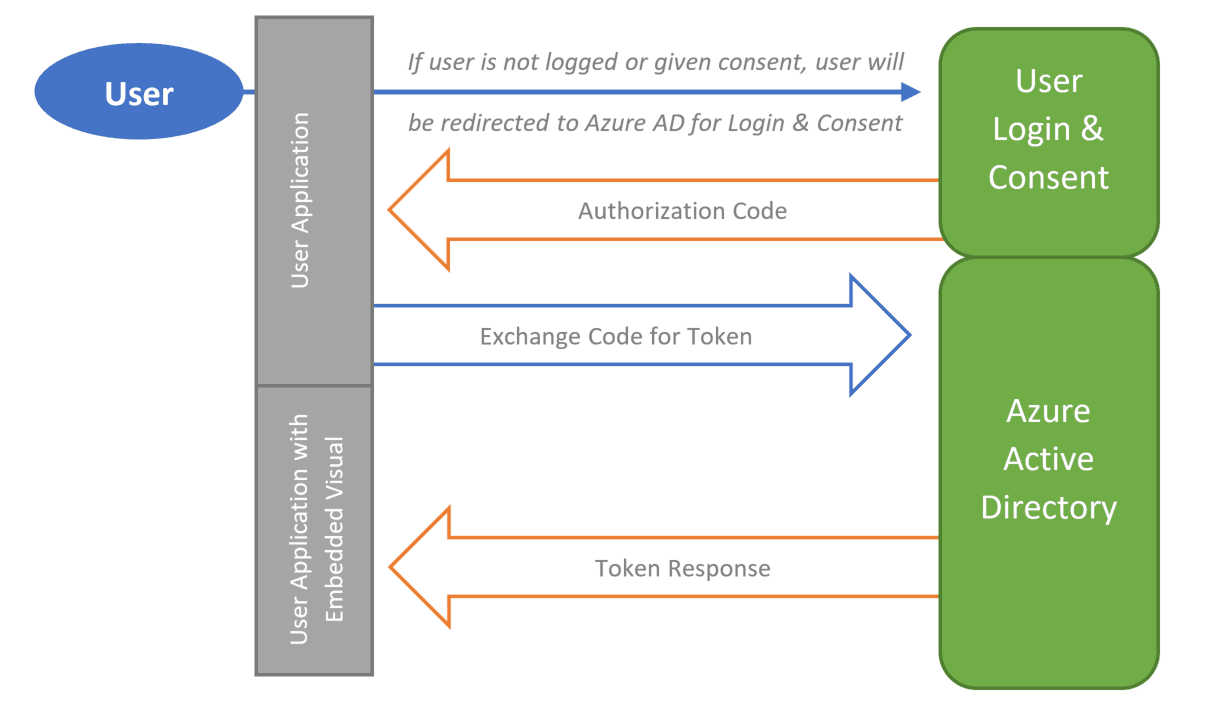
So, how does it work?
To start off, a user will log into an application and, if needed, provide consent (more on consent a little later). After logging in, an authorization code and the client secret (which somewhat functions like a password) are handed over to Azure Active Directory. Assuming that the application-provided information is correct, Azure Active Directory will then return a security token in order to grant access and allow for embedding between two applications. An example of this would be embedding a Power BI report within an internal application at your firm. This process is explained visually below:
 This process can work very well with a custom-built or internal application, however, if you are considering integrating with a third-party application such as Salesforce, there is a downside with the login process. Since Salesforce has its own login, users will have to log in twice – once to access Salesforce and once to your Power BI environment each time. Additionally, it can take a lot of custom developer time to work with Salesforce and get it to communicate properly between applications.
Additionally, in an ideal production environment, a single page will handle your authorization process and different pages in your application will handle different reports for where lines of communication get redirected.
What about giving consent?
When logging into an application accessing Azure Active Directory for the first time, users will usually have to give consent. User consent is set up by default and allows users to grant Azure Active Directory access to applications. In simple terms, it is a step for users to have control over what applications they are authorizing to perform the tasks it is trying to complete – in this case, accessing a Power BI report. An admin can override this default setting if they find it appropriate.
Depending on the settings that your system admin has put in place, consent will only have to be given the first time a user logs in, or not at all if your admin has granted consent across your entire user group, also known as Admin Consent. Additionally, Admin Consent can be set up on an individual application basis, so that one application can have Admin Consent granted while another application can rely on User Consent.
Sometimes we find that an admin within an organization has disabled user consent for the entire company. This can cause issues when getting set up for the first time. Usually when this is the case, a user will see an error stating that they cannot give consent and that their admin needs to grant consent for them. Since user consent has been disabled, that only leaves the path for Admin Consent which will then require an admin to grant access. To summarize, Admin Consent needs to be granted once for the application and User Consent needs to be granted once for each user.
Using Embedded Reports
The most common reason I hear for wanting to embed data from another website would have to be enhancing reporting and dashboard viewing capabilities. You can, of course, embed more than just reports and dashboards – datasets are popular too.
As an example, let’s say you have a Power BI report that you want to be able to see displayed in a custom application within your organization. Once your authorization with Azure Active Directory has been established, you can embed your Power BI report within your application by using an iframe or other custom HTML code. This makes it easier for you and your users to see your application data and reports side by side in a single instance, as opposed to looking at two applications at one time.
Although the authentication process can sometimes be confusing to get started, once established it will make accessing reports and dashboards through other applications much easier for your team. If you need help with Power BI or just want to chat about opportunities for enhancement, please reach out to us!